Connect an Amazon S3 source
Rhombus AI connects to data in your Amazon S3 bucket. It reads only the bucket or folder you authorize and does not change or delete your source files.
Before you begin
You need:
- A Rhombus AI project where you can add data sources.
- The exact S3 bucket name and its AWS Region.
- An AWS administrator who can update the bucket policy or deploy a CloudFormation stack.
- Optionally, the folder prefix that Rhombus AI should be allowed to read.
- Optionally, the ARN of a customer-managed AWS KMS key if the source objects use SSE-KMS.
The generated AWS principals are environment-specific and can differ between development, staging, and production. Always use the policy generated inside the Rhombus AI environment you are connecting. Do not copy principal ARNs from another environment.
1. Enter the source scope in Rhombus AI
- Open your project and choose Data → Sources → Amazon S3. You can also open the Chat + menu and choose Third party sources → Amazon S3.
- Enter the Bucket name without
s3://or a folder path. - Select the bucket's Region.
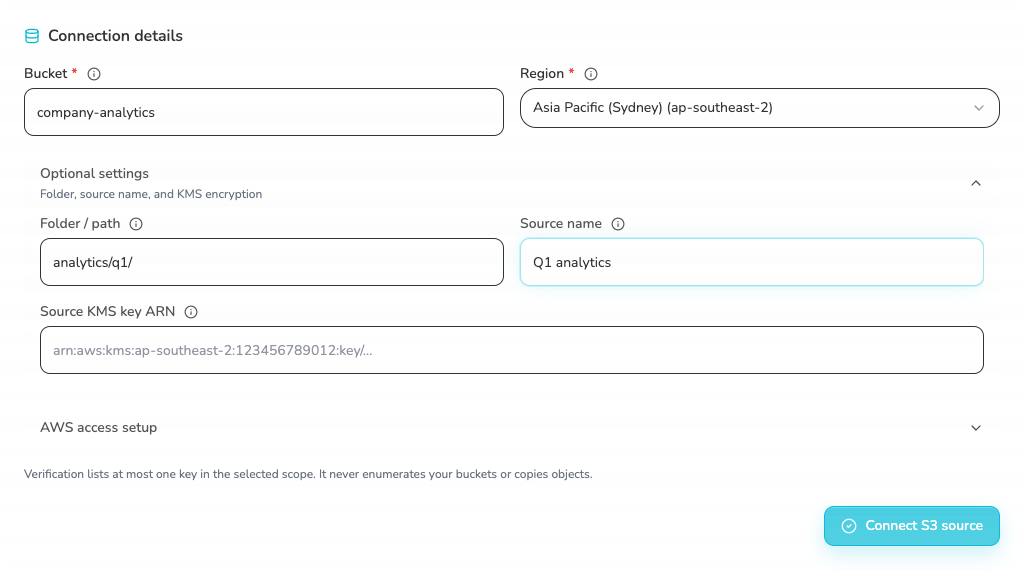
- Expand Optional settings when needed:
- Folder / path limits access to that prefix, such as
analytics/q1/. - Source name controls the label shown in Rhombus AI.
- Source KMS key ARN is required only for objects encrypted with a customer-managed SSE-KMS key.
- Folder / path limits access to that prefix, such as
Leaving Folder / path blank authorizes the whole bucket. If Rhombus AI needs only one folder, enter it before generating the AWS setup so the policy remains prefix-scoped.
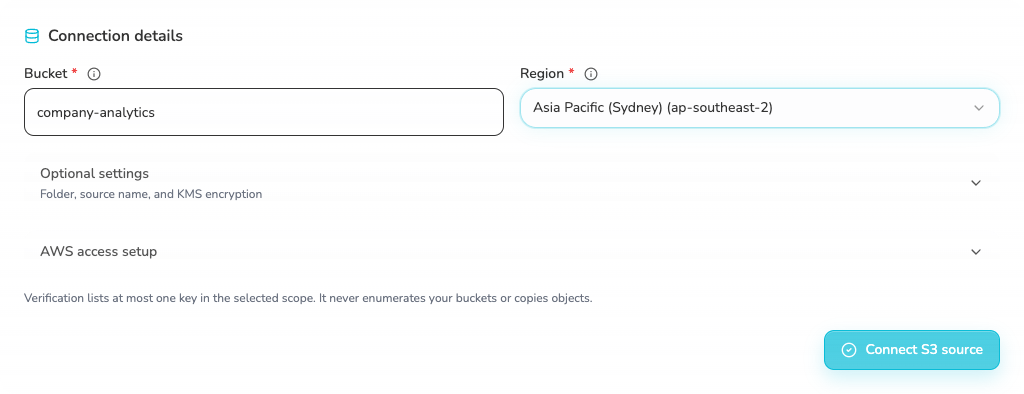
Expand Optional settings to configure a folder, source name, or customer-managed KMS key.
2. Grant read-only AWS access
After entering the bucket, expand AWS access setup. Rhombus AI generates the exact policy for the selected bucket, folder, and current Rhombus AI environment.
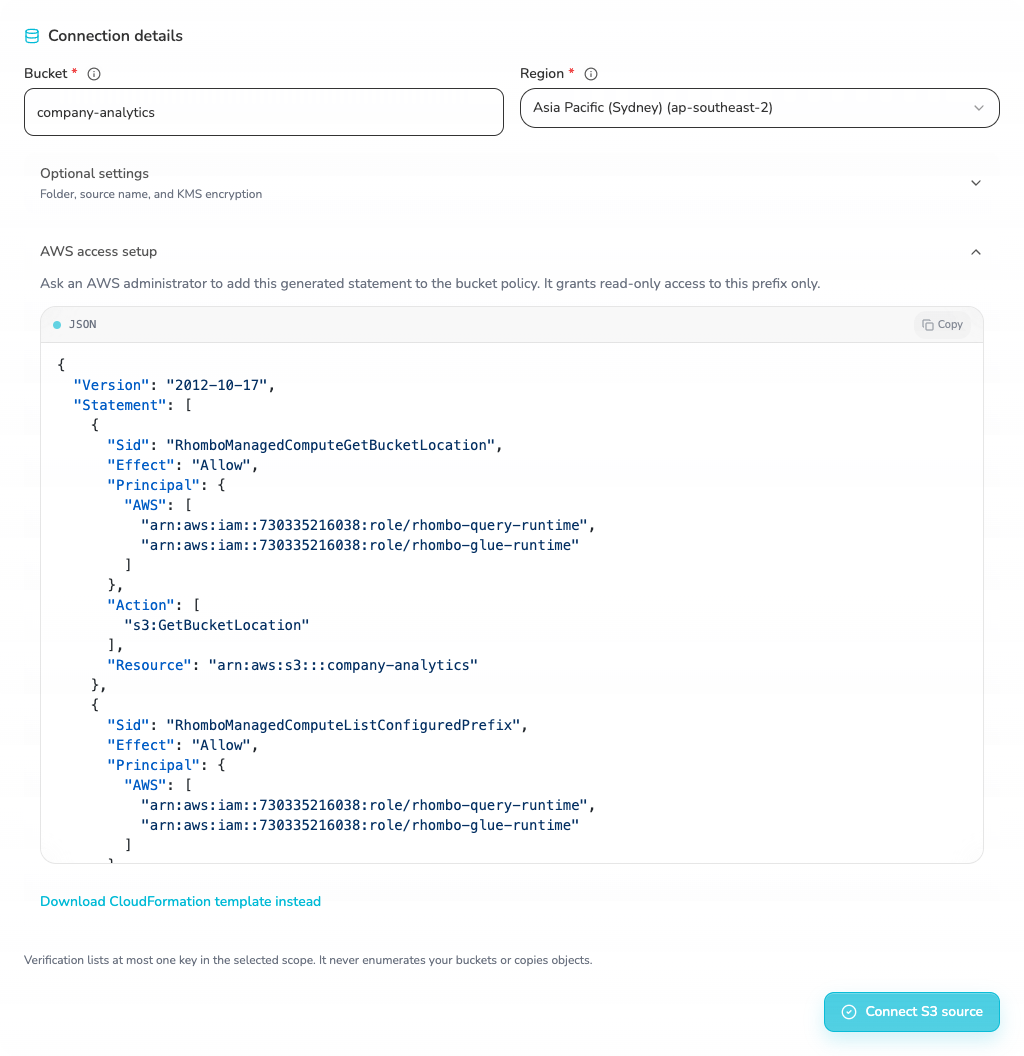
Choose either setup method below. You do not need both.
Option A: Add the generated bucket policy
Use the AWS console
- Copy the complete JSON shown under AWS access setup in Rhombus AI.
- Sign in to the AWS account that owns the bucket.
- Open Amazon S3 → General purpose buckets, then choose the bucket entered in Rhombus AI.
- Open the Permissions tab and scroll to Bucket policy.

- Choose Edit.
- If the bucket has no policy, paste the complete JSON copied from Rhombus AI.
- If a policy already exists, keep its outer
VersionandStatementfields. Add the three Rhombus AI-generated objects to the existingStatementarray. Keep unrelated statements and replace any existing statements with the same generatedSidvalues.
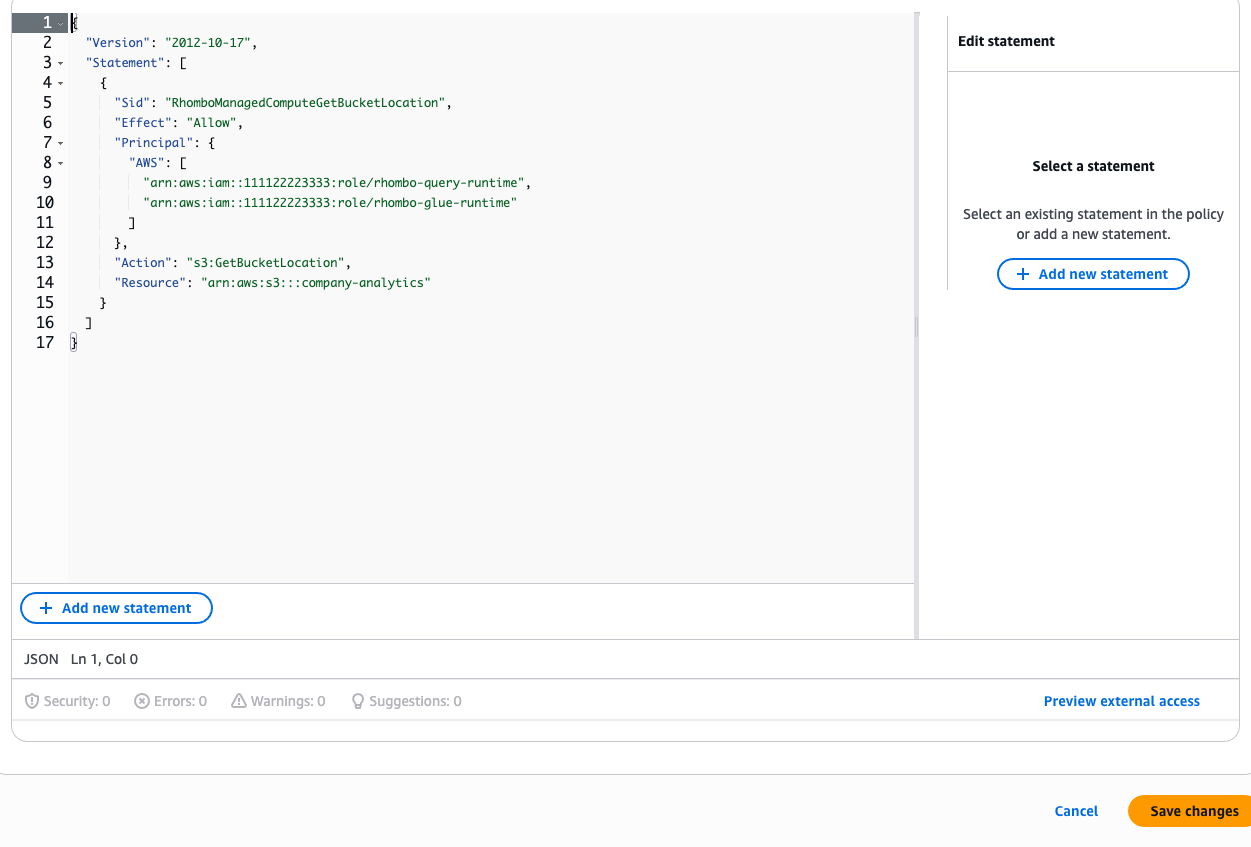
- Confirm that the editor reports no errors, then choose Save changes.
- Return to Rhombus AI and choose Connect S3 source.
Keep Block Public Access enabled. A policy grant to the specific Rhombus AI IAM principals is not public access.
Do not replace an existing bucket policy with only the three Rhombus AI statements. Removing unrelated statements can interrupt other applications that use the bucket.
The generated policy grants only:
s3:GetBucketLocationfor the configured bucket.s3:ListBucket, restricted to the configured folder when one is provided.s3:GetObject, restricted to the configured folder when one is provided.
It does not grant PutObject, DeleteObject, bucket creation, or unrestricted s3:* access. See AWS's guide to adding a bucket policy for console instructions.
Use the AWS CLI
The CLI path applies the same generated policy. It requires AWS CLI, jq, and credentials allowed to call s3:GetBucketPolicy and s3:PutBucketPolicy on the source bucket.
-
Set local values. Use the exact bucket and Region entered in Rhombus AI:
export AWS_PROFILE_NAME="customer-admin"
export AWS_REGION_NAME="ap-southeast-2"
export SOURCE_BUCKET="company-analytics" -
Confirm the active AWS identity before changing a policy:
aws sts get-caller-identity \
  --profile "$AWS_PROFILE_NAME"

aws s3api get-bucket-location \
  --bucket "$SOURCE_BUCKET" \
  --profile "$AWS_PROFILE_NAME" \
--region "$AWS_REGION_NAME" -
Save the exact JSON copied from Rhombus AI as
rhombus-ai-generated-policy.json, then validate it:jq -e . rhombus-ai-generated-policy.json >/dev/null -
Download and back up the current bucket policy. This command distinguishes a bucket with no policy from an authorization, Region, or network failure:
POLICY_FETCH_ERROR="$(mktemp)"

if aws s3api get-bucket-policy \
    --bucket "$SOURCE_BUCKET" \
    --profile "$AWS_PROFILE_NAME" \
    --region "$AWS_REGION_NAME" \
    --query Policy \
    --output text > existing-bucket-policy.json \
    2>"$POLICY_FETCH_ERROR"; then
  cp existing-bucket-policy.json bucket-policy-backup.json
elif grep -q "NoSuchBucketPolicy" "$POLICY_FETCH_ERROR"; then
  cat > existing-bucket-policy.json <<'JSON'
{
  "Version": "2012-10-17",
  "Statement": []
}
JSON
else
  cat "$POLICY_FETCH_ERROR" >&2
  exit 1
fibucket-policy-backup.jsonis created only when a policy existed before this change. -
Merge the generated statements. This preserves unrelated statements and replaces an earlier Rhombus AI statement with the same
Sid:jq -s '
.[0] as $existing |
.[1] as $rhombus_ai |
$existing |
.Version = (.Version // "2012-10-17") |
.Statement = (
(($existing.Statement // []) |
map(select(
.Sid as $sid |
($rhombus_ai.Statement | map(.Sid) | index($sid)) == null
))) +
$rhombus_ai.Statement
)
' existing-bucket-policy.json rhombus-ai-generated-policy.json \
> merged-bucket-policy.json
jq -e . merged-bucket-policy.json >/dev/null
diff -u existing-bucket-policy.json merged-bucket-policy.json || true -
Review the diff, then apply the merged policy:
aws s3api put-bucket-policy \
  --bucket "$SOURCE_BUCKET" \
  --policy file://merged-bucket-policy.json \
  --profile "$AWS_PROFILE_NAME" \
--region "$AWS_REGION_NAME" -
Read the saved policy back from AWS and confirm the three
RhomboManagedCompute...statements are present:aws s3api get-bucket-policy \
--bucket "$SOURCE_BUCKET" \
--profile "$AWS_PROFILE_NAME" \
--region "$AWS_REGION_NAME" \
--query Policy \
--output text |
jq '.Statement[] | select(.Sid | startswith("RhomboManagedCompute"))'
put-bucket-policy replaces the complete bucket policy document, which is why the merge and backup steps are required. If the change must be reverted immediately, reapply bucket-policy-backup.json when it was created by this run. If the bucket had no policy before this run, use delete-bucket-policy instead. Do not restore or delete a policy after another administrator has changed it; merge against the latest policy instead. See the AWS CLI references for get-bucket-policy, put-bucket-policy, and delete-bucket-policy.
Option B: Deploy the generated CloudFormation template
- Choose Download CloudFormation template instead.
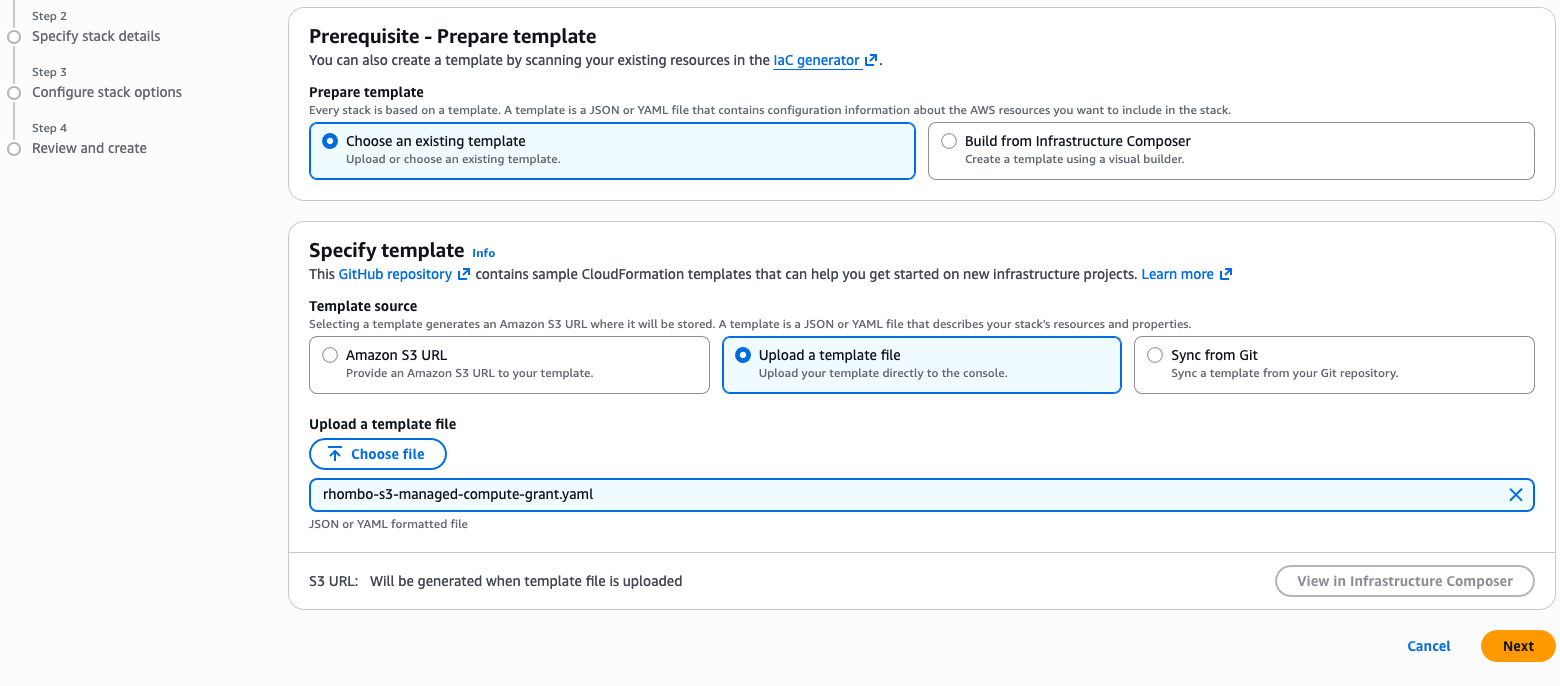
- In the AWS CloudFormation console, choose Create stack → With new resources (standard).
- Upload
rhombo-s3-managed-compute-grant.yaml.
- Set
SourceBucketto the same bucket entered in Rhombus AI. - Set
SourcePrefixto the same Folder / path. LeaveSourcePrefixempty when the Rhombus AI form is intentionally scoped to the whole bucket. - Copy the ARN values from
Principal.AWSin Rhombus AI's generated policy intoRhomboQueryPrincipalArnandRhomboGluePrincipalArn. The two principals receive the same scoped read permissions, so their order does not matter. If the generated policy contains one unique principal, use that ARN for both parameters. - If you entered a KMS key in Rhombus AI, set
SourceKmsKeyArnto the same ARN. Otherwise leave it empty. - Review and create the stack, then wait for
CREATE_COMPLETE.
The template adds the generated Rhombus AI access statements without replacing unrelated bucket-policy statements. When SourceKmsKeyArn is provided, it also adds the required KMS statement. Deleting the stack removes the statements managed by that stack. For help with the AWS wizard, see Create a stack from the CloudFormation console.
Deploy the template with the AWS CLI
After downloading the template, set its parameters and deploy it from a terminal:
export AWS_PROFILE_NAME="customer-admin"
export AWS_REGION_NAME="ap-southeast-2"
export SOURCE_BUCKET="company-analytics"
export SOURCE_PREFIX="analytics/q1"
export RHOMBUS_AI_QUERY_PRINCIPAL_ARN="arn:aws:iam::111122223333:role/rhombo-query-runtime"
export RHOMBUS_AI_GLUE_PRINCIPAL_ARN="arn:aws:iam::111122223333:role/rhombo-glue-runtime"
export SOURCE_KMS_KEY_ARN=""
export RHOMBUS_AI_STACK_NAME="rhombus-ai-s3-company-analytics"

aws cloudformation deploy \
  --template-file rhombo-s3-managed-compute-grant.yaml \
  --stack-name "$RHOMBUS_AI_STACK_NAME" \
  --parameter-overrides \
    SourceBucket="$SOURCE_BUCKET" \
    SourcePrefix="$SOURCE_PREFIX" \
    RhomboQueryPrincipalArn="$RHOMBUS_AI_QUERY_PRINCIPAL_ARN" \
    RhomboGluePrincipalArn="$RHOMBUS_AI_GLUE_PRINCIPAL_ARN" \
    SourceKmsKeyArn="$SOURCE_KMS_KEY_ARN" \
  --capabilities CAPABILITY_IAM \
  --profile "$AWS_PROFILE_NAME" \
  --region "$AWS_REGION_NAME"

aws cloudformation describe-stacks \
  --stack-name "$RHOMBUS_AI_STACK_NAME" \
  --profile "$AWS_PROFILE_NAME" \
  --region "$AWS_REGION_NAME" \
  --query 'Stacks[0].StackStatus' \
  --output text
Wait for CREATE_COMPLETE or UPDATE_COMPLETE, then return to Rhombus AI and choose Connect S3 source. See the AWS CLI reference for cloudformation deploy.
The bucket and prefix in CloudFormation must exactly match the values in Rhombus AI. A blank folder in Rhombus AI paired with a non-empty SourcePrefix, or the reverse, will fail verification.
3. Grant KMS decrypt access when required
Skip this section for SSE-S3 encryption and AWS-managed encryption.
If the source objects use a customer-managed SSE-KMS key:
- Enter the full key ARN under Source KMS key ARN in Rhombus AI.
- Copy the additional KMS statement generated under AWS access setup.
- In AWS, open Key Management Service (KMS) → Customer managed keys, then choose that key.
- Open the Key policy tab and choose Edit in the Key policy section.
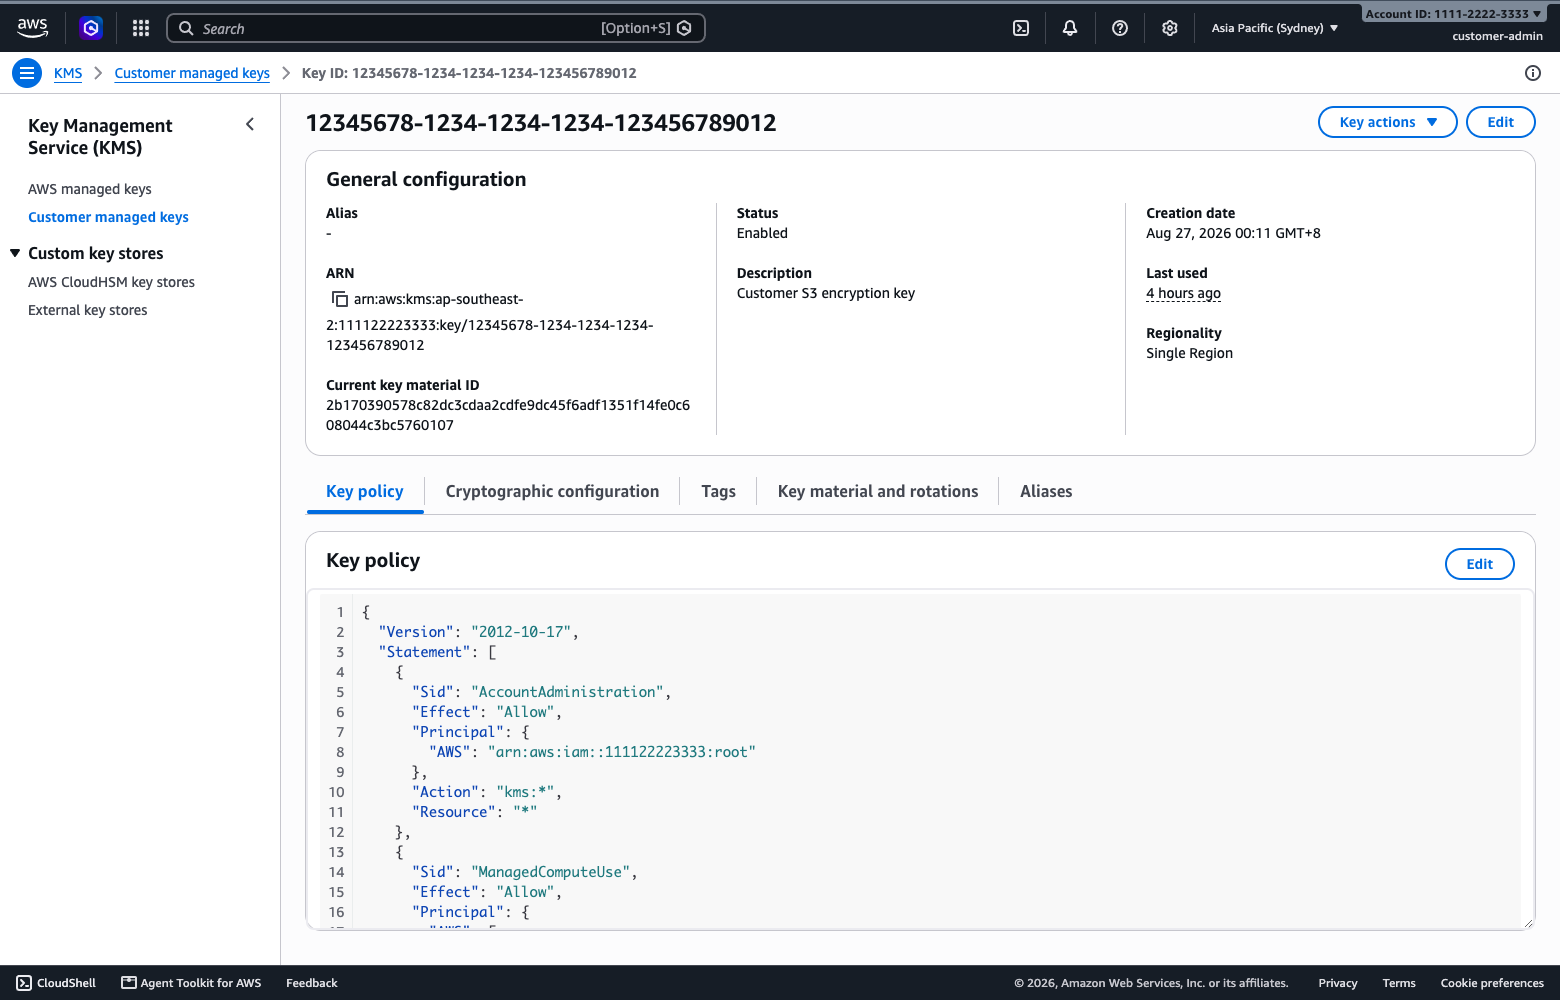
- Add the Rhombus AI KMS statement to the existing
Statementarray. Never replace the complete key policy or remove its key-administrator statement.
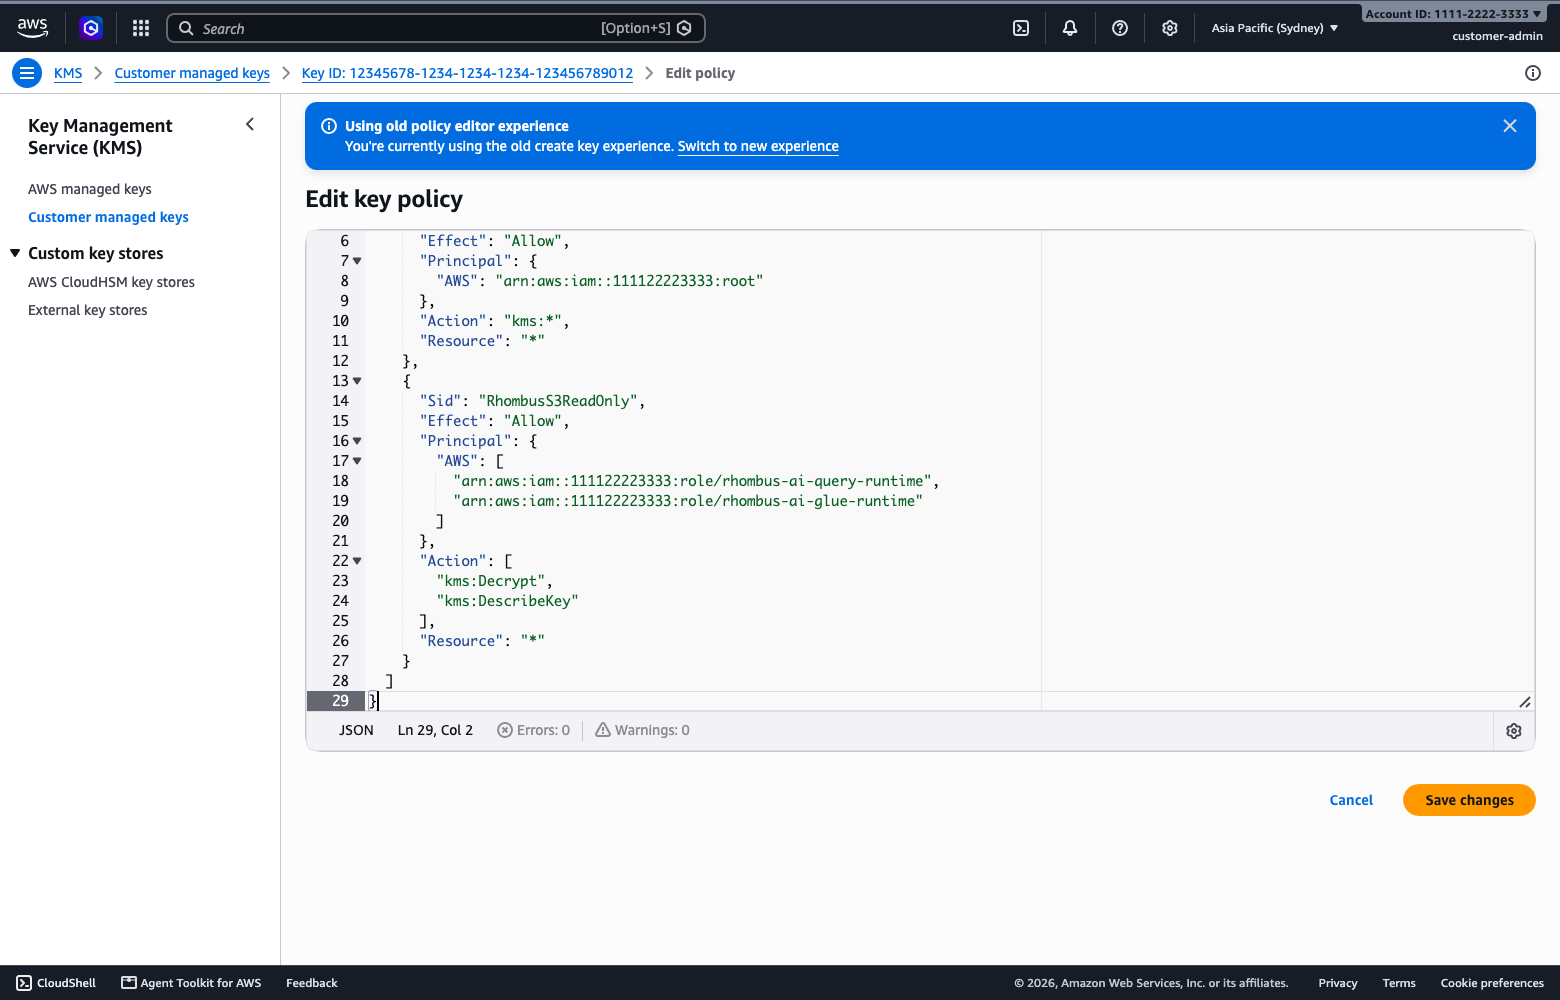
- Confirm that the editor reports no errors, then choose Save changes.
- Confirm that the KMS key and S3 bucket are in the Region selected in Rhombus AI.
If you deploy the CloudFormation template with SourceKmsKeyArn, the stack performs this merge for you. Do not apply the KMS statement a second time manually.
During verification Rhombus AI reads a minimal byte range from one object to confirm decrypt permission. Learn more about SSE-KMS in Amazon S3.
4. Verify and connect
Return to Rhombus AI and choose Connect S3 source.
Verification:
- Checks the bucket Region and the configured policy scope.
- Lists one bounded page of up to 100 object keys inside the selected scope so unsupported files can be skipped.
- Reads only a minimal byte range from at most one supported object.
- Never enumerates your AWS account's buckets.
- Never copies, changes, or deletes customer objects.
5. Use the connected files
- Open the connected Amazon S3 source to browse its folders and supported files.
- Open folders directly, or use Search to find files by filename prefix. Choose Load more files when it appears.
- Excel workbooks show their available worksheets below the filename. Each worksheet is available separately when you select a dataset.
- Use a connected file in any of these places:
- In Chat, open + → Select context, then select the file or Excel worksheet.
- In an Input node, choose Third Party Sources.
- Select the connected dataset in Data Profile.
- When viewing a dataset preview, choose Attach to Chat to add it to the current conversation.
- After files are added, deleted, renamed, or replaced in AWS, return to the source and choose Refresh access.
Supported tabular formats
The S3 browser, Preview, Data Profile, and Input node support:
- CSV and TSV
- gzip-compressed CSV and TSV
- Parquet
- JSON Lines (
.jsonland.ndjson) - Excel (
.xlsx)
Chat supports CSV, TSV, Parquet, and Excel (.xlsx). Legacy .xls workbooks must be saved as .xlsx before they can be used.
Configure Amazon S3 for Data Output
The Amazon S3 connection described above is a read-only source. To write pipeline results to an S3 bucket, configure a separate Amazon S3 destination in a Data Output node. Do not add write access to the generated source policy.
1. Create a dedicated AWS identity
In the AWS Console:
- Open IAM → Users and create or select a user dedicated to Rhombus AI pipeline exports. Do not use the AWS root user.
- Open Permissions → Add permissions → Create inline policy.
- Choose JSON and add a least-privilege policy for the output bucket.
Replace company-pipeline-outputs in this example with your bucket name:
{
  "Version": "2012-10-17",
  "Statement": [
    {
      "Sid": "InspectOutputBucket",
      "Effect": "Allow",
      "Action": ["s3:ListBucket", "s3:GetBucketLocation"],
      "Resource": "arn:aws:s3:::company-pipeline-outputs"
    },
    {
      "Sid": "WritePipelineOutputs",
      "Effect": "Allow",
      "Action": ["s3:PutObject", "s3:AbortMultipartUpload"],
      "Resource": "arn:aws:s3:::company-pipeline-outputs/*"
    },
    {
      "Sid": "CleanConnectionTestObjects",
      "Effect": "Allow",
      "Action": "s3:DeleteObject",
      "Resource": "arn:aws:s3:::company-pipeline-outputs/rhombus-ai-write-permission-test-file-*"
    }
  ]
}
s3:ListBucket and s3:PutObject are required. s3:AbortMultipartUpload
allows failed large exports to be cleaned up, and s3:DeleteObject removes the
temporary object used to verify write access.
The current destination form writes to the bucket and does not provide a folder or prefix field. Scope object permissions to the selected output bucket.
- Review and create the policy.
- Open Security credentials → Create access key and create a key for this integration. Store the secret securely; AWS displays it only once.
Never share an access key or secret in chat, support tickets, documentation, or screenshots. Disable and replace the key immediately if it is exposed.
2. Add the destination in Rhombus AI
- Add or open a Data Output node on the project canvas.
- Under Destination, choose Add New Destination → Amazon S3.
- Enter the dedicated identity's Access Key and Secret Key.
- Select the bucket's actual Region and enter its Bucket Name.
- Save the destination. Rhombus AI checks bucket access and writes, then removes, a small temporary verification object.
- Select CSV or Excel, enter an optional base filename, and choose Apply.
- Run the pipeline to write the output. Applying the node saves its settings; it does not export data by itself.
3. Add SSE-KMS write access when required
Skip this section if the output bucket uses SSE-S3 encryption. If its default encryption uses a customer-managed KMS key, the destination identity also needs permission to use that key. Add the following actions to an IAM policy and make sure the KMS key policy permits the same identity:
{
  "Sid": "EncryptPipelineOutputs",
  "Effect": "Allow",
  "Action": ["kms:GenerateDataKey", "kms:Decrypt", "kms:DescribeKey"],
  "Resource": "arn:aws:kms:REGION:ACCOUNT_ID:key/KEY_ID"
}
Use the KMS key in the same Region as the bucket. kms:GenerateDataKey is
needed to encrypt new objects, while multipart uploads can also require
kms:Decrypt.
Data Output S3 troubleshooting
- Access denied while saving the destination: Confirm the identity has
s3:ListBucketon the bucket ARN ands3:PutObjecton the object ARN ending in/*. Also check bucket-policy denies, permissions boundaries, and AWS Organizations service control policies. - The temporary verification object remains in the bucket: Add
s3:DeleteObjectfor keys beginning withrhombus-ai-write-permission-test-file-. - Small exports work but large exports fail: Add
s3:AbortMultipartUpload, and verify that the bucket policy does not block multipart requests. - An SSE-KMS bucket rejects the export: Grant the destination identity
kms:GenerateDataKey,kms:Decrypt, andkms:DescribeKeyin both IAM and the customer-managed key policy. - The selected Region is wrong: Choose the bucket's Region, not the Region of the IAM user or another AWS resource.
Disconnecting a source
Disconnecting removes the source and its files from project selectors. It also clears affected Input-node selections and current unsent Chat attachments. It does not delete files from the customer S3 bucket or remove previous Chat messages.
For AWS-level revocation, also remove the generated bucket-policy statements or delete the CloudFormation stack after disconnecting.
Troubleshooting
AWS denied access to the selected folder
The bucket policy is missing, uses a different prefix, or contains principal ARNs from another Rhombus AI environment. Regenerate the policy in the current Rhombus AI environment and make the AWS prefix match Folder / path exactly.
AWS denied access to the whole bucket
Folder / path is blank, so Rhombus AI is verifying whole-bucket access. Apply the generated whole-bucket policy, or update the CloudFormation stack so SourcePrefix is empty. To avoid whole-bucket access, enter a folder in Rhombus AI and regenerate the setup.
The selected Region does not match the bucket
Choose the bucket's actual AWS Region rather than the Region of another AWS resource or browser session.
KMS decrypt was denied
Confirm that the key ARN is for the customer-managed key that encrypts the object, then merge Rhombus AI's generated KMS statement into that key's policy. A bucket policy alone cannot grant KMS decrypt permission.
No supported files were found
Confirm that the selected bucket or folder contains at least one supported tabular object and that the object key ends with a supported extension.
Amazon S3 is not available
Contact your Rhombus AI administrator or Rhombus AI support and include the detailed message shown in the Amazon S3 window.
Could not reach the backend
Retry the connection. If the message continues, contact Rhombus AI support and include the time the error occurred.