Connect to Snowflake
You can use Snowflake in two ways:
- As a source, syncing tables and views into a project.
- As a Data Output destination, writing pipeline results to a Snowflake table.
Connect Snowflake as a source
Prerequisites
Have the following ready:
- A valid Snowflake Account identifier.
- A Snowflake Username and Password.
- Access to a Database, Schema, and Warehouse.
USAGEon the warehouse, database, and schema, plusSELECTon the tables or views you want to synchronize.- Write access to the Rhombus project.
- If the Snowflake account uses a network policy, allow the Fivetran connector addresses required by your deployment.
Your account or deployment must have Third Party Sources enabled. You also need an available connector and enough credits for the first sync. These limits do not apply to unlimited plans.
Setup connects to Snowflake to check the credentials and list available databases, warehouses, tables, and views. The selected objects are then synced through Fivetran. Workflow nodes use the synced Rhombus datasets rather than querying Snowflake directly.
The source wizard currently loads only the first 100 tables or views from the
PUBLIC schema. Search filters those results; there is no schema picker or next
page yet. Objects in other schemas, or beyond the first 100, will not appear.
This is a Rhombus limitation, not a Snowflake limitation.
Open the source connection wizard
-
Open the project Canvas.
-
Select the + button in the canvas toolbar. Its tooltip is Add Node.
-
Add a Data Input node and select it.
-
Under Upload Data, select Third Party Sources.
-
Select Add Data Sources. If the project has no connected sources, select Connect your first data source to get started instead.
-
Select Snowflake.
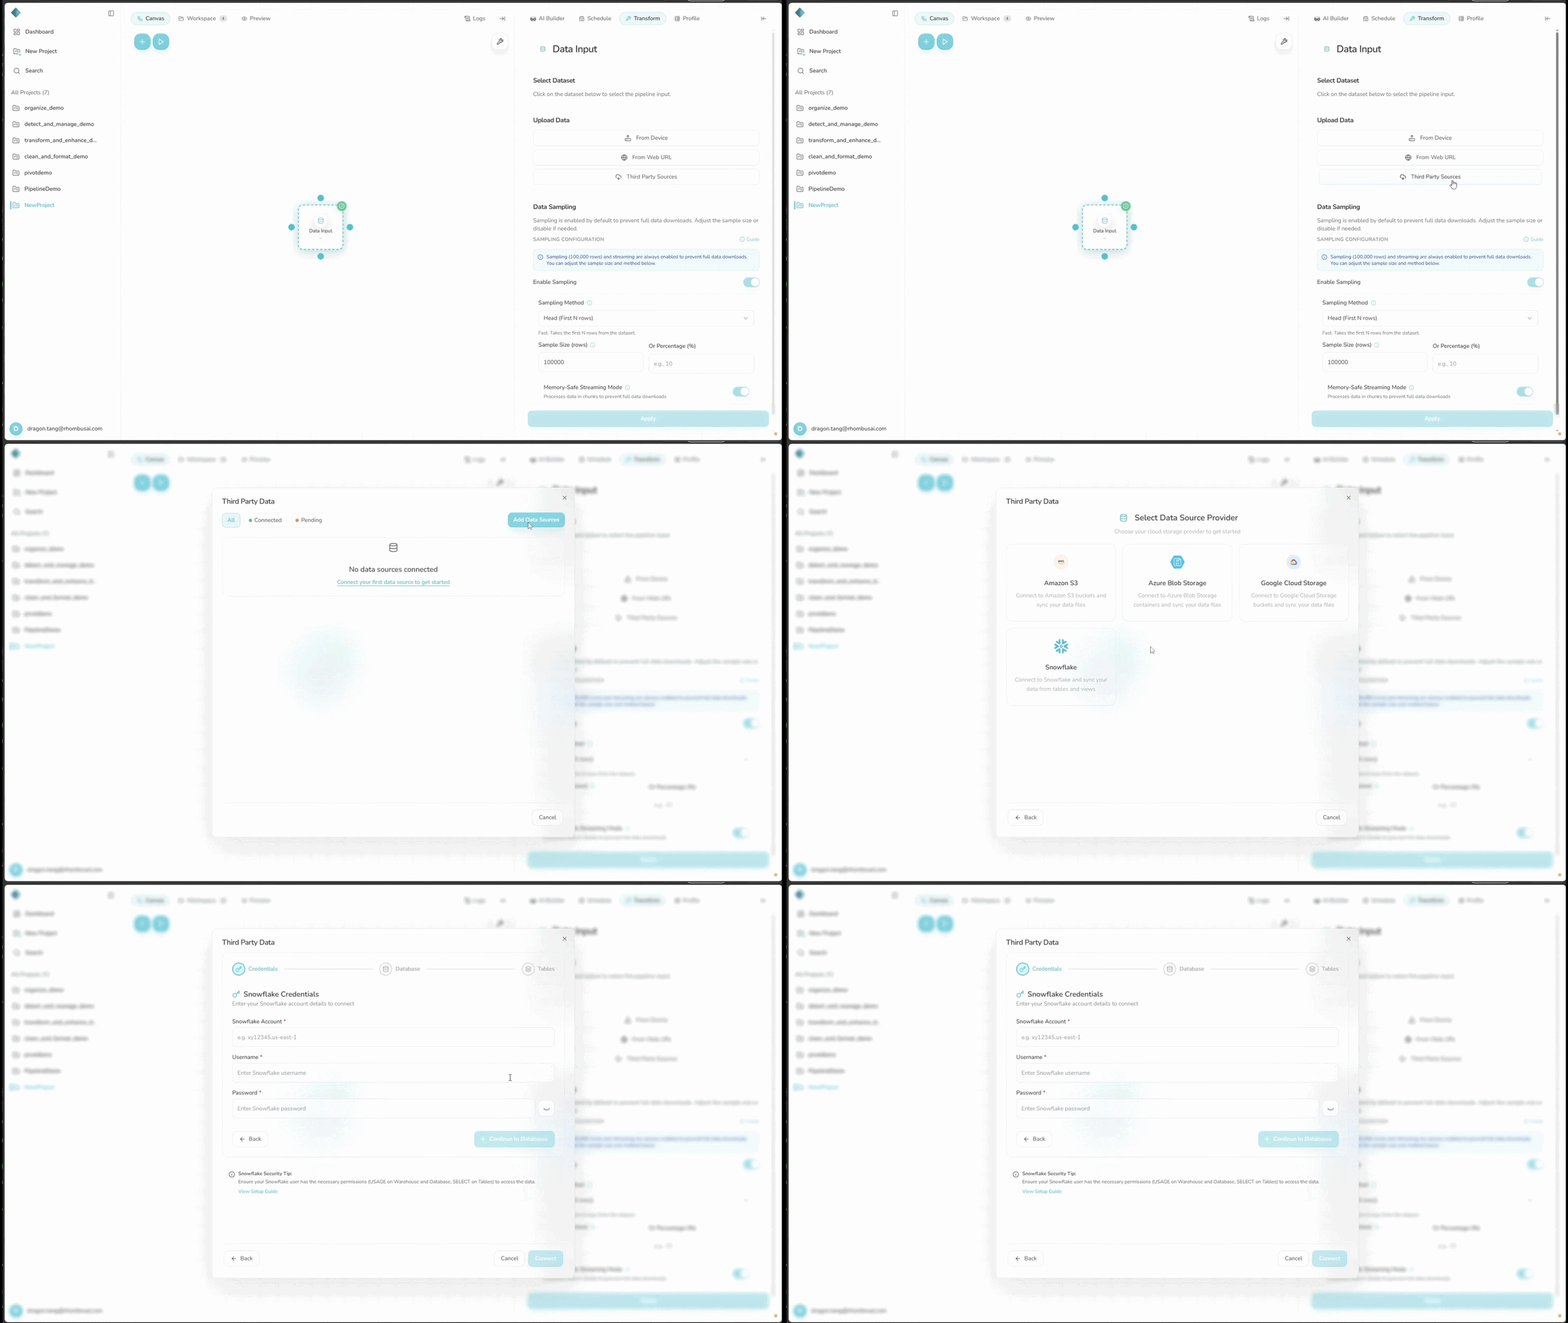
Wizard Step 1 — Enter credentials
The wizard has three steps: Credentials, Database, and Tables.
-
Enter your Snowflake Account identifier.
tipFind the account identifier in your Snowflake URL or account settings. A common format is
xy12345.us-east-1.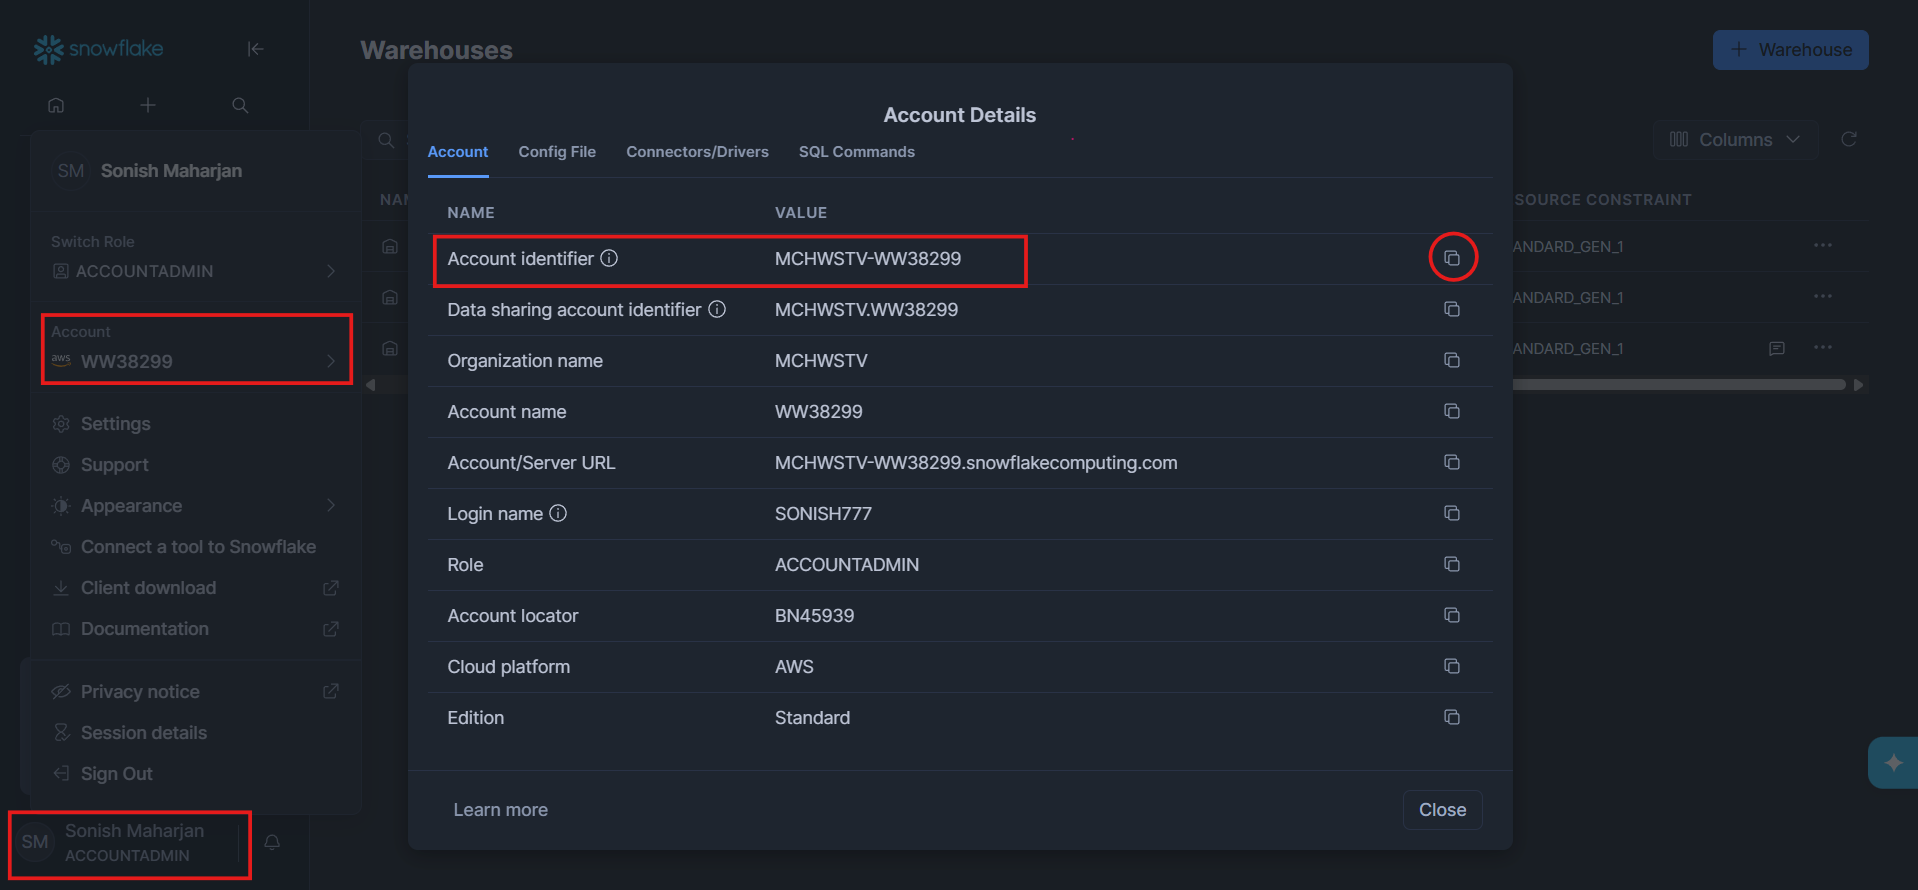
-
Enter your Username.
-
Enter your Password.
-
Select Continue to Databases.
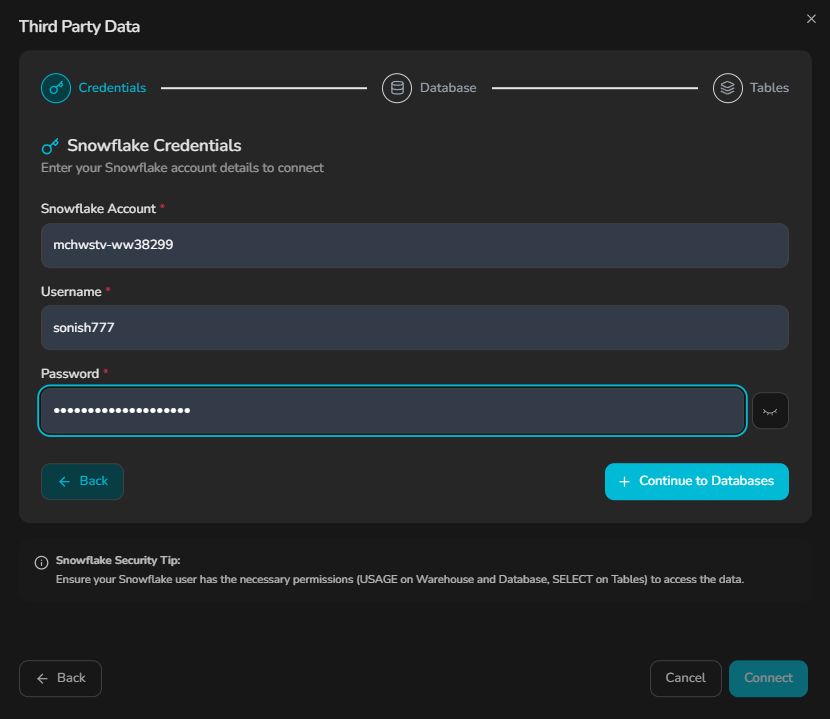
Continue to Databases becomes available after all three fields are filled. Snowflake then checks the credentials and returns the databases visible to that user.
Wizard Step 2 — Select a database
-
Search the database list if needed.
-
Select the database to synchronize.
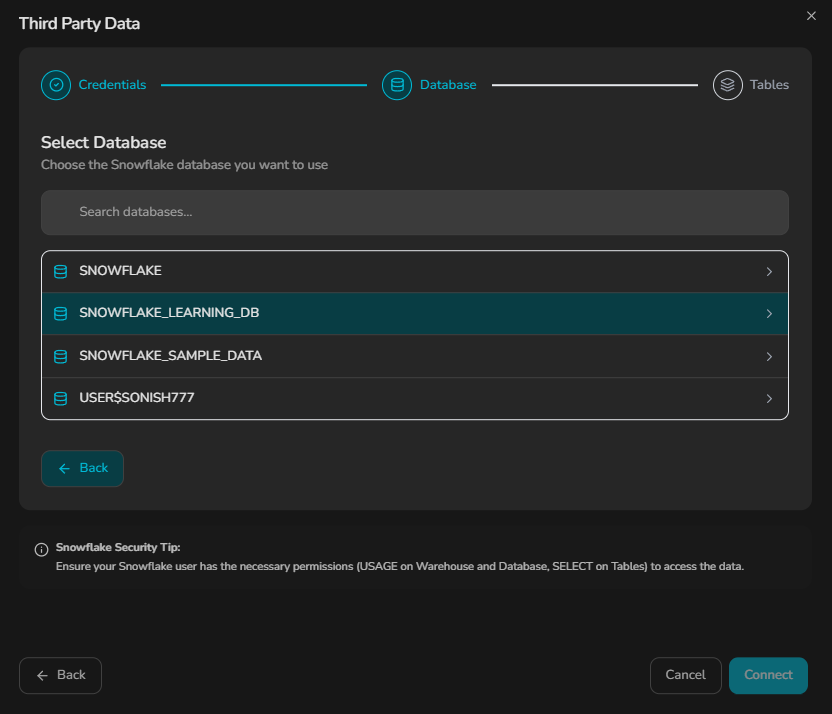
Selecting a database loads its discoverable objects and the warehouses visible to the Snowflake user. This is a one-time setup lookup, not a live view.
Wizard Step 3 — Select objects and a warehouse
-
Under Default Warehouse, select the warehouse for the connection.
The warehouse must be accessible to the Snowflake user and either running or able to resume when the connector needs it.
-
Browse or search the objects returned from the
PUBLICschema. Both tables and views can appear. -
Select one or more objects with their checkboxes.
-
Select Add Data Source (N tables), where
Nis the number selected.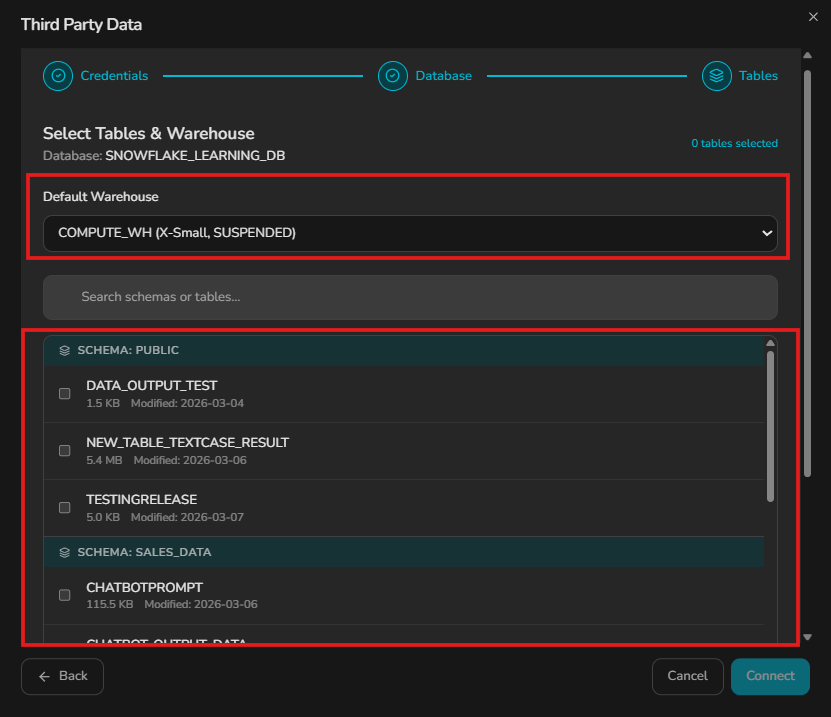
Adding the source starts the first sync. Each selected table or view appears as a project dataset once processing finishes.
Manage the source
- Open a Data Input node and select Third Party Sources to return to the source dashboard.
- Select View Files on the Snowflake source card to see synchronized objects and their statuses.
- Select Quick Attach to add up to the first nine synced datasets to chat.
- Select Delete to remove the source connection.
Use synchronized Snowflake data
- Add or select a Data Input node on the canvas.
- Under Select Dataset, choose the synchronized Snowflake table or view.
- Apply the Data Input configuration and connect it to the next node in the pipeline.
Synchronization behavior
- Initial synchronization: Adding the source starts its Fivetran-backed sync.
- Manual synchronization: In View Files, select Sync Now beside an object to request a new sync.
- Cooldown: Manual sync is available once every 30 minutes per underlying Fivetran connector. Snowflake objects that share the same connector also share its cooldown.
- Connector-managed mode: There is no Full or Incremental setting in the wizard. The connector chooses the sync behavior.
- Setup-time discovery: Rhombus does not monitor later Snowflake schema changes in real time. Reopen the setup flow when you need to create another source connection.
Connect Snowflake as a Data Output destination
A Snowflake destination writes pipeline results directly to a table. It does not use the source wizard or Fivetran sync.
Destination prerequisites
Have the following ready:
- The Snowflake account identifier, username, and password.
- The target database, warehouse, schema, and table name.
USAGEon the warehouse, database, and schema.- Permission to create and drop a temporary table in the schema. Rhombus checks this when the destination is created.
- The table privileges required by the selected write mode. Automatic table
creation requires
CREATE TABLE; writing to an existing table requires the corresponding DML privileges.
Create the destination
-
Add a Data Output node and connect the upstream result to it.
-
Select the Data Output node.
-
Under Select Destination, select Add New Destination.
-
Select Snowflake.
-
Enter the required values:
- Account
- User
- Password
- Database
- Warehouse
- Schema
- Table Name
For the most predictable results, start the table name with a letter or underscore and use only letters, numbers, and underscores.
-
Select Create Destination.
Verification creates and drops a temporary table. Once it passes, the destination is saved to the project. It is not selected automatically, so choose it from Select Destination after creation.
Configure Snowflake writes
After selecting the Snowflake destination, choose a Write Mode under Snowflake Creation Logic:
- Append adds the pipeline rows to the target table.
- Overwrite replaces the target table data.
- Upsert (Merge) updates matching rows and inserts new rows. Select a Primary Key when using this mode.
The table can be created automatically. Snowflake Table Setup also shows a
suggested CREATE TABLE statement based on the upstream output. If no schema is
available, run the upstream nodes first, then return to the Data Output node.
Apply the node and run the pipeline to write the result. Snowflake output is table-based, so the CSV and Excel options used by file destinations do not apply.
Troubleshooting
Third Party Sources is unavailable
- Confirm that third-party/Fivetran integrations are enabled for the account or deployment.
- Confirm that the plan includes data connectors and that the project has not reached its connector limit.
- Confirm that your account has enough credits for the data synchronization.
- Ask a project owner or editor to complete setup if you do not have project write access.
Connection fails at the credentials step
- Verify the Snowflake account identifier, username, and password.
- Confirm that password authentication is allowed for that Snowflake user.
- Confirm that the Snowflake account is active and reachable.
No databases appear
- Confirm that the user can access at least one database.
- Check the user's Snowflake roles and database privileges.
- Return to the credentials step and submit the credentials again.
Warehouse selection issues
- Confirm that the warehouse exists and is visible to the user.
- Grant
USAGEon the warehouse. - Confirm that the warehouse can run or resume and has sufficient credits.
Tables or views do not appear
- Confirm that the object is in the
PUBLICschema and within the first 100 discovery results. - Grant
USAGEon the database and schema andSELECTon the required objects. - Return to the database step and select the database again to repeat discovery.
Destination creation fails
- Confirm all seven destination fields are correct.
- Grant
USAGEon the warehouse, database, and schema. - Confirm that the user can create and drop a temporary table in the schema.
- Confirm that the target table name is valid.
A pipeline cannot write to Snowflake
- Confirm that the Snowflake destination is selected on the Data Output node.
- Check the privileges required for the selected write mode.
- For Upsert (Merge), select a valid primary-key column from the upstream output.
- Run the upstream nodes first if the Data Output node cannot determine the table schema.